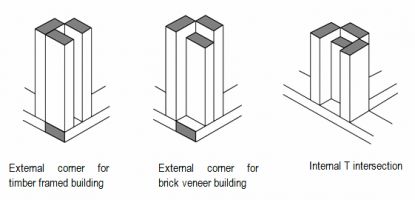
Wall junctions: There are two parts to securing a wall junction:
(a) One wall ends with two studs which are one stud-depth apart, sandwiching a couple of packers at 1200mm spacing. So, if studs are 90 x 35mm, then the gap between the two studs is 35mm, filled by a couple of short packers. The packers must be placed at the adjoining wall end. The adjacent wall end's stud is nailed to these packers.
(b) Lap joins at the wall plates, whether for internal partition walls or for external wall corners.
kellyjones00 (593)
Click to enlarge
|
|
|
Raising walls:
- For easier handling, create shorter wall sections, and lap-join the top wall plate over a stud.
- Hardwood wall frames are very heavy, and even heavier when clad with sheet bracing. Leave the plywood sheets off until erected. This might be required anyway, if adjoining partition walls need to be affixed directly to the internal side of a wall frame.
- Attach the galvanised strap tie-downs temporarily to both bottom and top plate, since you won't be able to slide it underneath after the wall is erected.
- Screw stopping blocks at the outer edge of the wall, to the joist or bearer, to stop the frame sliding off the edge of the building.
- Ask another person to help erecting the wall and to hold it plumb (90° to the horizontal) while temporary bracing is secured.
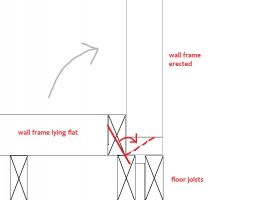
- To stop the frame sliding while being erected, drive a nail diagonally through the bottom plate towards and into a supporting floor joist. The nail will bend ninety degrees when the wall is upright.
kellyjones00 (593)
Click to enlarge
|
|
|
Joining wall plates: Never join top plates over an opening like a window or door.
1. Top plates are butt-jointed either:
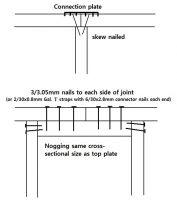
(a) over a wall stud, with a connector plate across the joint, over two skew nails, or
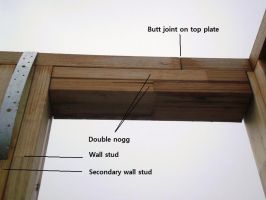
(b) between two wall studs, strengthened by two nail-laminated noggings under the plate ("double nogg"), the same width as the top plate, with 3/3.05mm nails either side of the butt join above, and 2/3.05 nails from either side of the noggings.
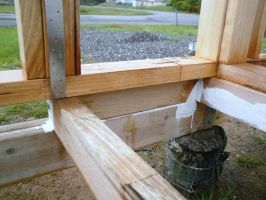
2. Bottom plates are butt-joined over solid support, like a rim joist or rim block, which is firmly secured to the joists.
kellyjones00 (593)
Click to enlarge
|
|
|
Image of floor joist rim block: Bottom plates are butt-joined over solid support, like a rim joist or rim block, which is firmly secured to the joists.
kellyjones00 (593)
Click to enlarge
|
|
|
General Tips for Joining Wall Plates:
- It is better to avoid joining wall plates on long stretches with no intermediate wall partitions or external buttressing. Even short lengths of wall (<1m) will push outwards or inwards at the top plate.
- If joining wall plates in several places along a wall, the outwards force of the rafters will be increased, so it is advisable to use ceiling joists to tie the top plates together.
- If choosing option (a), the supporting wall stud is installed after erecting the new wall frame alongside the existing wall.
- If choosing option (b), ensure any shoulder jacks or studs adjacent to the double-nogg's stud are not installed until after the latter is secured.
- When nailing the double-nogg in place, you will need a ladder or scaffold. Try to avoid leaning against the top-plate, as this will push the butt-joints out of alignment. Use clamps to hold the double-nogg in place while pre-drilling and nailing.
kellyjones00 (593)
Click to enlarge
|
|
|
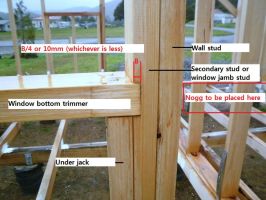
Notches: Notches are shallow cuts or checks into wall studs, to embed window head trimmers and bottom trimmers more securely. They extend a maximum of 10mm or a quarter the breadth of the stud, whichever is less. Placing a nogg on the outside is good building practice. Also, a checked window head trimmer can act as a lintel in a non-loadbearing wall, so long as the opening width is no more than 1200mm.
kellyjones00 (593)
Click to enlarge
|
|
|
