Main > Building & fixing > Building > Building tools > Framing gun
Basic tips:
- Flat paper-joined cartridges of nails are aligned on a specific angle. Ensure this angle matches the gun magazine angle.
- Framing nails are usually between 3.05mm and 3.15mm in diameter, depending on the wood type.
- Before use, empty the magazine of all nails. Check for single nails.
- If using an air-powered gun, connect the hose before turning on the power and air.
- Put a drop of suitable viscosity machine oil into the air hose before each use. Alternatively, dribble oil over the cartridge of nails after loading.
- Test the trigger mechanism before loading, so that it fires only when activated (e.g. pressing the muzzle against the timber, then squeezing trigger).
- Accurate nailing requires a firm grip. Don't allow the gun to move laterally when firing, as this will bend the nail, but a small recoil should be permitted.
- Bent nails, or nails that split timber, are not considered successful structural fasteners.
- It is possible to fire into predrilled holes, with good practice.
- If placing an active gun down, always position it so the firing range is directed away from all people and animals. Do not walk in front of the gun.
kellyjones00 (593)
|
|
|
Main > Building & fixing > Building > Building tools > Saw
Portable circular saw: For a straight cut, cut fast. This also reduces any small splinters at the bottom, finishing end of the cut. The blade should extend a maximum of 6mm below the timber, for maximum blade efficiency, as well as safety.
kellyjones00 (593)
|
|
|
Main > Building & fixing > Building > Building tools > Saw
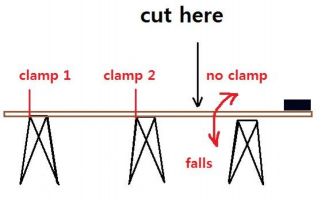
Cutting planks: To avoid the saw binding with the timber, cut on the unclamped side of two clamped sections. If the piece cut off is very long, weight the far side so the falling piece lifts up and away when cut. If it is weighted to fall down, it will push against the saw blade, which may kick back against you.
kellyjones00 (593)
Click to enlarge
|
|
|
Main > Building & fixing > Building > Timber > Walls
General Tips for Joining Wall Plates:
- It is better to avoid joining wall plates on long stretches with no intermediate wall partitions or external buttressing. Even short lengths of wall (<1m) will push outwards or inwards at the top plate.
- If joining wall plates in several places along a wall, the outwards force of the rafters will be increased, so it is advisable to use ceiling joists to tie the top plates together.
- If choosing option (a), the supporting wall stud is installed after erecting the new wall frame alongside the existing wall.
- If choosing option (b), ensure any shoulder jacks or studs adjacent to the double-nogg's stud are not installed until after the latter is secured.
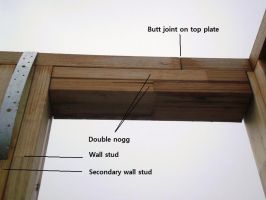
- When nailing the double-nogg in place, you will need a ladder or scaffold. Try to avoid leaning against the top-plate, as this will push the butt-joints out of alignment. Use clamps to hold the double-nogg in place while pre-drilling and nailing.
kellyjones00 (593)
Click to enlarge
|
|
|
Main > Building & fixing > Building > Timber > Bracing
Installing plywood sheet bracing:
In smaller wall areas, especially where plumbing and electrical lines will be installed, it is better to erect and plumb walls first. Then mark on the walls where plumbing pipes and conduits will be installed. Install noggs to support sheet bracing around these access points, then install the sheet bracing, leaving the access points unclad. Later, after plumbing and electrical work is finished, the final pieces of bracing can be secured.
kellyjones00 (593)
|
|
|
Main > Building & fixing > Building > Timber > Ceiling
Nailing ceiling joists:
- First secure the ladder well.
- Use strong metal clamps to hold the joist in place when nailing.
- Hammer towards the body, with one foot against the joist and the other on ladder rung.
- If using multigrips, nail the horizontal tab to the top wall plate first, then the vertical tab to the top wall plate, and finally the last vertical tab to the ceiling joist. If skew-nailing, pre-drill and oil the nail.
- If a rafter will be installed against the joist later, don't leave nail heads protruding on that side.
kellyjones00 (593)
|
|
|
Main > Building & fixing > Building > Timber > Ceiling
Use ceiling joists to tie the top wall plates together, against the outward force of the rafters.
kellyjones00 (593)
|
|
|
Main > Building & fixing > Building > Timber > Ceiling
Use ceiling joists to help stabilise top plate movement on either side of wall joins.
kellyjones00 (593)
|
|
|
Main > Building & fixing > Building > Timber > Windows
For evenness of appearance, the tops of windows are placed at the same distance as the tops of doors, from the floor. This point is very slightly below the eaves lining, which rests on the window and door heads (upper reveal).
kellyjones00 (593)
|
|
|
Main > Building & fixing > Building > Timber > Bracing
Wall insulation batts are fitted before sheet bracing is complete.
kellyjones00 (593)
|
|
|
Main > Building & fixing > Building > Insulation
If plywood bracing is required, then batts are installed before the sheet bracing is completed.
kellyjones00 (593)
|
|
|
Main > Building & fixing > Building > Insulation
Install floor insulation batts before floor boards. Batts can be suspended on parallel lines of durable plastic cord, or plastic straps, that are wound or stapled along the bottom edge of floor joists, about 100-200mm apart. When installing rockwool batts, always use gloves, glasses, hat and wear old clothes that can be thrown out.
kellyjones00 (593)
|
|
|
Main > Building & fixing > Building > Timber > Walls
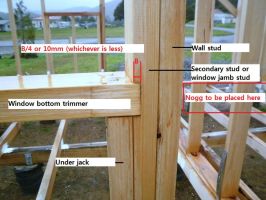
Notches: Notches are shallow cuts or checks into wall studs, to embed window head trimmers and bottom trimmers more securely. They extend a maximum of 10mm or a quarter the breadth of the stud, whichever is less. Placing a nogg on the outside is good building practice. Also, a checked window head trimmer can act as a lintel in a non-loadbearing wall, so long as the opening width is no more than 1200mm.
kellyjones00 (593)
Click to enlarge
|
|
|
Main > Building & fixing > Building > Timber > Roof > Safety
Taking roofing equipment up: Don't carry equipment when climbing a ladder, but keep hands free for holding to rungs and rails.
General tips:
- Use a tool pouch on a belt for carrying a hammer, tape measure, pencil, nails and mobile phone with you at all times.
- Install a couple of temporary, sided platforms on the ceiling joists for holding equipment: boxes of nails, framing gun, nail oil, plans, bottle of water, snacks, sun lotion.
- Alternatively, use buckets hung around the roofing area, or secure tools to studs using short bungee cords. Power drills can also be secured to one's belt.
- Transfer equipment to the roof by placing it in a sturdy bucket and hauling it up by a rope.
- Transfer an air framing gun to the roof, then connect it to the hose, then pressurise the hose.
kellyjones00 (593)
|
|
|
Main > Building & fixing > Building > Timber > Roof > Safety
General roofing safety tips:
- Choose calm, clear, cool weather for roofing.
- Never work on a slippery, wet roof.
- Use rubber shoes with dry, clean soles.
- Keep the roofing area clean of dirt, mud and debris.
- Always move hoses and extension cords out of the way of one's feet.
- Wear sunglasses, hat, and full skin cover.
kellyjones00 (593)
|
|
|
Main > Building & fixing > Building > Timber > Roof > Safety
Using a roofing harness:
- Where it is possible to fall 2m from a roof, use a full body harness (a personal fall arrest system) and not a waist belt.
- First create a slide guard near the edge of the roof, by installing roof brackets every 4' on the top surface of rafters, within 18" of the eaves, and placing planks along these brackets.
- Second, attach roof anchors over the ridge beam and secure by hammering (not shooting) nails into two opposing rafters. The roof anchor should be at least 2m from the edge of the roof.
- Ensure the body harness is snug, and has D hooks on front and back of the body. A short 1m lanyard, with energy / shock absorber, is hooked onto the body harness with a locking carabiner. Its other end has a spring-loaded clutch that slides along a rope, which in turn is secured into the roof anchor.
kellyjones00 (593)
|
|
|
Main > Building & fixing > Building > Timber > Bracing
Fastening plywood structural bracing:
50mm spacing along top and bottom wall plates, and on horizontal butt joints; 100mm spacing along vertical edges; 150mm spacing along intermediate studs. Leave a 2mm expansion gap at butt joints between adjacent sheets.
- They are prone to warping and then are impossible to fix properly. Store completely flat and with flat sheets on top to stop curling and warping, or install immediately and completely.
- Never leave plywood bracing fixed incompletely to stud walls!
kellyjones00 (593)
|
|
|
Main > Building & fixing > Tools > Storage
When storing metal tools in metal toolboxes, spray a thin film of water-repellent lubricant over the metal tools to prevent rusting by condensation. Alternatively, wrap them in oil-soaked rags, or in wooden boxes on a bed of sawdust.
kellyjones00 (593)
|
|
|
Main > Building & fixing > Tools > Storage
Store electronic tools in sealed plastic tubs, or covered in plastic sheet, to prevent water damage.
kellyjones00 (593)
|
|
|
Main > Building & fixing > Tools > Storage
Declutter the workbench and floor area nearby for safety and ease of use. A first aid kit and fire blanket should be immediately handy. Frequently-used hand tools, safety gear, and fasteners should be closest to the workbench. Furthest away from the work bench should be hazardous and dangerous items like poisons, flammable chemicals, electricity boards and the like.
kellyjones00 (593)
|
|
|
Main > Building & fixing > Building > Timber > Verandah
A verandah also acts as wall buttresses, assisting in resisting rafter force, and, if the roof slope is flattish, as scaffolding while building the main roof.
kellyjones00 (593)
|
|
|
Main > Building & fixing
Delivery delays are highly likely to happen, for a range of unavoidable reasons. Instead of getting frustrated, have a backup plan so other jobs can be completed in the waiting period.
kellyjones00 (593)
|
|
|
Main > Building & fixing > Carpentry > Bending wood
There are several methods to bend wood: (i) using heat, (ii) laminating, (iii) cutting notches, (iv) chemicals.
(i) Heat: Dry heat may burn timber; to avoid this, use a steaming box, or more cheaply, wrap wetted timber in black plastic and leave in the sun for several hours. The timber will bend far more easily.
(ii) Laminating: Bend thin timber strips then glue in layers for strength.
(iii) Cutting notches: Cut parallel grooves 10-15mm apart to two-thirds the depth of timber. After bending, glue veneer over the bend to strengthen the bend.
(iv) Chemicals: Chemically pure anhydrous ammonia is used in commercial applications to bend timber, but is very dangerous and can weaken timber.
kellyjones00 (593)
|
|
|
Main > Building & fixing > Building > Timber > Bracing
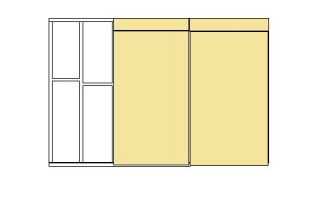
If plywood sheets are too short: If the walls are higher than plywood sheets, and a small piece is required to clad the entire frame, then put the full piece below and the small piece at the very top. Any rain that soaks into the ply sheets drains and collects at the bottom. A full sheet at the bottom means less exposed ends to warp.
kellyjones00 (593)
Click to enlarge
|
|
|
Main > Building & fixing > Carpentry > Oils, stains, varnishes
Linseed oil as a timber coating:
- To reduce the long drying time, coat timber when it is dry, in a dry atmosphere, where rain is not expected for a week, and add mineral turpentine at 1:1.
- Raw vs. "boiled" linseed oil: the raw form soaks into timber better. The "boiled" form creates a harder surface.
- It is not UV resistant, and can support timber-feeding organisms like mould or mildew.
kellyjones00 (593)
|
|
|
Main > Building & fixing > Tools > Cleaning > Saw blades
By cutting greenwood, resin or "pitch" will quickly build up on the teeth of a saw. The disc will heat up faster, not cut well, and be prone to warping. Take the blade off and clean the resin off while still soft, before much use heats and hardens it. Soak in mineral turps for several hours, then use a plastic implement like a plastic paint scraper or nylon scourer to rub off the gunge, and do not use metal scrapers or files.
kellyjones00 (593)
|
|
|
Main > Building & fixing > Building > Timber > Storage
Unseasoned timber (greenwood) hardens as it dries, but if stored wrapped or under a tarp before the moisture content reduces through ventilation, fungi and mould will grow through the timber and it will become rotten. It is best to use greenwood timber immediately, and let it dry in a ventilated, uncovered state in the finished construction.
Oil unseasoned timber immediately after use in construction, for instance with 50% raw linseed oil and 50% mineral turpentine.
kellyjones00 (593)
|
|
|
Main > Building & fixing > Carpentry > Safety & Hygiene
Avoid collecting sawdust throughout one's clothing by wearing a dust jacket. A lab coat works well.
kellyjones00 (593)
|
|
|
Main > Building & fixing > Carpentry
Using a nail punch: Place a little finger against the tip of the nail punch, as a guide when hitting the nail punch with a hammer.
kellyjones00 (593)
|
|
|
Main > Building & fixing > Tools > Saws
Choosing a power saw for house building:
A 185mm diameter blade on a portable circular saw with adjustable cutting depth and mitre angles up to 45° is fine for a small gable-roofed building with timbers up to 50mm deep. But a hipped-roof building will require many highly accurate mitre cuts, possibly higher than 45° bevels on hip jack rafters, and therefore a larger diameter than 185mm blade even if the timbers are still only 50mm deep.
kellyjones00 (593)
|
|
|
Main > Building & fixing > Tools > Saws
Blades for power saws:
- The blade with more teeth (e.g. >24T) cuts hardwood, or creates a smoother finish, or cuts across the grain. Less teeth are used for ripping and softwood.
- Choose a blade with regular inlets cut between teeth to help dispel the build-up of heat, and prevent warping. Holes in the blade also do this.
- While a basic "curling wave" tooth design is fine for softwood, a shallow V-cut in each tooth, like the valley of a cusp, is better for hardwood.
kellyjones00 (593)

Click to enlarge
|
|
|
Main > Building & fixing > Tools > Body-care
If using a hammer frequently, don't forget to stretch the hands and fingers, as well as other major muscles.
kellyjones00 (593)
|
|
|
Main > Building & fixing > Tools > Body-care
If the angle of a nail is hard to get to, try switching the hammer to your other, weaker hand, with support at the heel of the hammer by your stronger hand.
kellyjones00 (593)
|
|
|
Main > Building & fixing > Tools > Clamps
General tips for clamps:
- The strongest grip is provided by metal screwing clamps, while fast adjustment is provided by plastic sliding clamps but less grip strength.
- Cheap plastic clamps break under normal pressure.
- A ball-in-socket joint at one grip allows for some variation in the angle of the two pieces gripped, where they are not parallel.
kellyjones00 (593)
|
|
|
Main > Building & fixing > Tools > Hammers
Multiple uses for a claw hammer:
- Push and remove nails
- Tighten wing-nut screws (e.g. tensioners on strap bracing)
- Measure distances roughly
- Loosen a rusted screw or bolt
- More gently persuade timber into place than using a mallet or block hammer
kellyjones00 (593)
|
|
|
Main > Building & fixing > Fixing > Pest management
Wasps: Protect timber structural members from wasps, chewing off the surface for nest material, by coating with linseed oil or painting.
kellyjones00 (593)
|
|
|
Main > Building & fixing > Building > Timber > Roof
Coupled vs. uncoupled rafters: Coupled rafters are securely fastened to ceiling joists and the wall plates, meaning the weight of the roof does not push the wall plates outwards. Uncoupled rafters, as in a cathedral ceiling, do not have this connection to the ceiling joists, and may only be used with a ridge beam that carries the weight of the roof.
kellyjones00 (593)
|
|
|
Main > Building & fixing > Building > Timber > Roof
A solution for a ridge beam treated as a ridge board: If a ridge member called a ridge beam, with some coupled and some uncoupled rafters, has been given smaller dimensions by a structural engineer that resemble a ridge board and is consequently joined halfway without a support underneath the join, a solution is to create a king post that sits under the join, or a nearby king post extending a strut up to the join.
kellyjones00 (593)
|
|
|
Main > Building & fixing > Building > Metal > Roofing
Fasteners for corrugated metal sheet:
- At the top and bottom battens, the tek-screw should be driven at the top of every second crest. Intermediate battens can have screws every third crest. Do not fasten the top row of screws until the ridge capping is in place.
- For most roof slopes, the top batten should be placed a maximum of 100mm from the apex of the rafters or ridge beam / board, so the ridge capping, and roof cladding can be fastened with the same screws. But over 45 degrees, the batten needs to be much closer to the apex, such as 25 - 50mm.
- For ordinary slopes, corrugated foam should be placed between the corrugated sheets and the ridge capping to prevent water, dust and embers from entering the roof space. Also, cutting a wavy edge to the ridge capping to fit flush with the corrugated iron cladding, on ordinary slopes, will help.
- Fold up the ends of the metal sheets at the top, to prevent rain driving in over the top of the sheets.
- Fasten the flashing before the ridge capping.
kellyjones00 (593)
|
|
|
Main > Building & fixing > Carpentry > Using timber
Wet vs. dry: wet timber can split more easily yet also bend more easily.
kellyjones00 (593)
|
|
|
Main > Building & fixing > Building > Timber > Doors
General tips for Hanging a Door:
- First place the door in the frame to ensure a 3mm clearance on all sides. 75mm x 3.15mm nails can act as spacers.
- Check the jambs for plumb (both vertical), no winding (parallel), and aligned to the same depth relative to the wall cladding
- The jambs should either be level with the interior wall lining or be a little proud
- Solid doors, or doors of 2m height, e.g. 2040mm (standard) need three hinges, and taller and wider doors need four hinges.
- Mark the locations of hinges using a very sharp pencil or a stanley knife, with the top of the top hinge 200mm from the top of the door, and the bottom hinge 250mm from the bottom of the door. A central hinge can be positioned centrally.
- If the hinge needs to be rebated, use a sharp chisel to mark out the hinge outline (don't chisel past this), then in small increments take out the depth of the hinge.
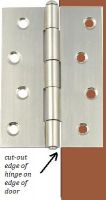
- See below image for how to align the hinge to the door. Note the slightly smaller hinge leaf is attached to the door.
- Predrill pilot holes exactly in the centre of the hinge holes. Manually hand screw the screws to the door.
- Place the door against the jamb, ensuring it is level and plumb. Set it on packers to get the correct height and clearance. Mark the hinge locations on the door jamb.
- Cut out the rebates on the door jamb carefully with a sharp chisel. A full hinge-width chisel makes this job easier.
- Predrill holes for the very top and very bottom screws, and attach these manually. Check the door for closure without binding or jamming. If all is well, continue to put in the top hinge and bottom hinge screws, and do the middle hinge last.
kellyjones00 (593)
Click to enlarge
|
|
|
Main > Building & fixing > Building > Timber > Flooring
Installing hardwood timber floor boards (General tips):
- Stack the timber flat in the enclosed but ventilated destination room for a few weeks to ensure the moisture content is suitably adjusted.
- If using recycled floorboards, use a fine file or sandpaper to remove crud from the tongue-and-groove edges. Remove nails that block tight fitting.
- Install reflective foil sarking under the floor, and then lay insulation batts on top of the sarking between the floor joists.
- Spring a chalk line down the centre of the room across the floor joists. Using 50 x 2.8mm nails, fix the first timber floor board to this line.
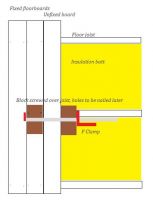
- A cheaper version of floor clamps is to use a long sturdy F-clamp. Place one foot of the clamp flat against a small board screwed to a fixed floor board, and the other foot against a small, spare piece of tongue-and-groove board (*) that slots into the unfixed new board to be nailed. Place a knee against the loose piece (*) to avoid it tilting up. When the unfixed board is tightly slotted into the last fixed board, predrill and nail it in place.
- The last board against the wall plate is pre-ripped, leaving a gap of 10mm to the wall plate. Use a pinch bar against the wall plate to push it firmly against the fixed board.
kellyjones00 (593)
Click to enlarge
|
|
|
Main > Building & fixing > Building > Timber > Ceiling
A tip for nailing tongue-and-groove pine lining planks to ceiling rafters:
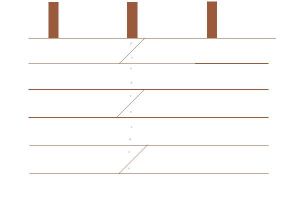
Use diagonal butt joints, the ends cut on a 45 degree angle. Stagger the joints regularly. It looks interesting and neat, and also ensures that each end gets a nail that sits squarely in the centre of the rafter.
kellyjones00 (593)
Click to enlarge
|
|
|
Main > Building & fixing > Building > Wet areas > Tiling
General tips for tiling:
1. Tiling is about an orderly repeated pattern. To aid in keeping tiles aligned neatly, draw a grid on the wall, based on the tile size plus grout gap. For floor tiling, lay the tiles out with spacers, and leave them there while affixing tiles in batches.
2. For wall tiles, start by affixing a board about two tile lengths up from the floor, for tiles to rest on and to ensure they are level to the floor. Use wedges instead of cross-spacers, which suit the tile depth and grout gap, to assist in levelling the tiles.
3. Only mix about 3sqm of tile adhesive at a time. It should be the consistency of tooth paste. A wooden spatula can be used instead of a rotary mixer for smaller jobs (e.g. 3sqm worth).
4. Tile adhesive should be spread with a toothed trowel across the entire back of the tile. Clean off any drips before pressing into place. Don't slide tiles into place.
5. For floor tiling, butter the floor with adhesive. For wall tiling, especially tiles larger than 200mm square, butter the back of the tile rather than the wall for neatness. This helps reduce surplus adhesive doesn't block up the grout gaps.
6. Keep the working area and your hands clean. Keep a sponge in a bucket of water nearby to wipe hands and drips of adhesive, as you work.
7. Tile spacers (crosses) can be left in place.
8. Wipe off any drips of adhesive, especially in the grout gap. Leave adhesive to cure for 24 hours before grouting.
Grouting:
1. Use a sharp knife to cut out any tile adhesive that squeezed up into the grout gap.
2. Brush off any loose adhesive.
3. Spray the area lightly with water.
4. Mix grout with a sealant additive to reduce bacteria, fungi and mould growth. Mix up to 3sqm. A wooden spatula is fine. Leave it for 5 minutes to stiffen.
5. If grout hardens in the bucket, give it a mix with the spatula and it will become viscose again.
6. Start at the bottom of the wall or the furthest edge of the floor from the door. Use a foam-bottom trowel to push grout into the tile gaps, ensuring grout is not just sitting on the surface of the gap.
7. Run the edge of the foam diagonally across the tiles to remove any excess grout. Work quickly, as grout sets fast.
8. Only do up to 3sqm at a time, then go over the grouted area with a damp (not wet) sponge to moisten and remove grout from the tile surface.
9. After about 15 minutes, use a clean sponge to wipe the tiles again. Do two wipes (front and back of sponge) then rinse the sponge. Take the time to be fastidious.
10. Leave the grout to set for 24 hours. Polish tiles with a cloth, then reseal to help create water and stain resistance.
11. When resealing grout, don't use a roller-applicator, as this wastes the sealant liquid. Instead, use a paint brush. It also gets into the corners more easily.
kellyjones00 (593)
|
|
|
Main > Building & fixing > Electrical > Extra-low voltage
Within Australia and New Zealand, extra-low voltage is <120V dc ripple-free and <50V ac. Anyone who knows how can install and/or work on extra-low voltage wiring. Anything above that voltage requires an electrician's license.
kellyjones00 (593)
|
|
|
Main > Building & fixing > Electrical > Extra-low voltage
Safety precautions:
1. Working with solar panel arrays:
- First cover modules with tied-on blankets, to prevent an electrical current from being produced. A nominally 72V dc system can produce a potentially lethal 120 volts.
- Keep your non-dominant hand behind your back or in your pocket at all times. An electric current travelling from one hand to the other will go via the heart.
2. Working with inverters:
- Off-grid inverter output is as lethal as grid-connected inverter output, even when no load is connected, and even when it shows sleep mode.
- Disconnect both positive and negative terminals on the battery bank.
- Open the double pole main switch to break the leads, and secure it open. Remove the inbuilt fusible link and keep in your pocket until work is completed.
3. Working with batteries:
- Be very careful not to accidentally bridge the terminals on a battery, by, for instance, dropping a spanner onto them.
- For instance, a charged 48v 1000Ah battery bank can produce short-term currents of multiple tens of thousands of amps, and may exceed 1 million watts.
- Always insulate the rest of the spanner used to fit interconnecting cables or tighten terminals.
- Always wear goggles and overalls when working on batteries, sealed or not.
- Never bring any source of sparks near a battery.
- Never, ever smoke near a battery.
- Ensure cross-ventilation of air where batteries are stored.
- If electrolyte accidentally comes into contact with eyes or skin, bathe the affected area liberally in clean water and seek medical help.
- Do not store batteries directly on a floor, but raise above to avoid corrosion.
kellyjones00 (593)
|
|
|
Main > Building & fixing > Carpentry
Find wall studs:
1. Using neodymium magnets. These will locate drywall screws that are screwed into studs.
2. By knocking on the wall. At the stud the knocking will produce a higher-pitched sound.
thesource (378)
|
|
|
