Main > Building & fixing > Building > Timber
Selecting fallen-down trees for building posts: the heavier, drier, and denser they are, the better. Some timbers can be placed in the ground, and be debarked, whereas others will rot or grow fungi if so treated.
kellyjones00 (593)
|
|
|
Main > Building & fixing > Building > Timber
Choosing structural timbers: for bearers and joists, laminated veneer lumber (LVL) is straighter and stronger than normal dried dressed timber. This means it is easier to get the base of the building level, and bows and bumps don't need to be planed off before cladding the floor.
kellyjones00 (593)
|
|
|
Main > Building & fixing > Building > Timber
Sorting: When timber is delivered, sort it into types (e.g. bearers, joists, studs, plates, rafters, beams, etc.) and stack in ordered piles on piers off the ground, with airflow around all timber members. Ensure the bowed edge is weighted down and all bows are aligned. Leaving timber unweighted will cause the timbers to dry according to the coil of wood-fibres, and warp fixedly.
kellyjones00 (593)
|
|
|
Main > Building & fixing > Building > Timber > Walls
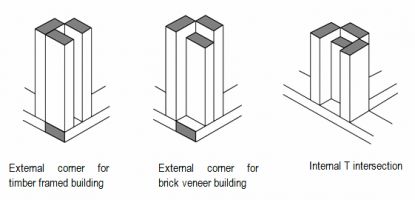
Wall junctions: There are two parts to securing a wall junction:
(a) One wall ends with two studs which are one stud-depth apart, sandwiching a couple of packers at 1200mm spacing. So, if studs are 90 x 35mm, then the gap between the two studs is 35mm, filled by a couple of short packers. The packers must be placed at the adjoining wall end. The adjacent wall end's stud is nailed to these packers.
(b) Lap joins at the wall plates, whether for internal partition walls or for external wall corners.
kellyjones00 (593)
Click to enlarge
|
|
|
Main > Building & fixing > Building > Timber > Walls
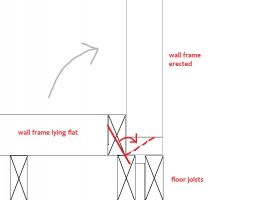
Raising walls:
- For easier handling, create shorter wall sections, and lap-join the top wall plate over a stud.
- Hardwood wall frames are very heavy, and even heavier when clad with sheet bracing. Leave the plywood sheets off until erected. This might be required anyway, if adjoining partition walls need to be affixed directly to the internal side of a wall frame.
- Attach the galvanised strap tie-downs temporarily to both bottom and top plate, since you won't be able to slide it underneath after the wall is erected.
- Screw stopping blocks at the outer edge of the wall, to the joist or bearer, to stop the frame sliding off the edge of the building.
- Ask another person to help erecting the wall and to hold it plumb (90° to the horizontal) while temporary bracing is secured.
- To stop the frame sliding while being erected, drive a nail diagonally through the bottom plate towards and into a supporting floor joist. The nail will bend ninety degrees when the wall is upright.
kellyjones00 (593)
Click to enlarge
|
|
|
Main > Building & fixing > Building > Timber > Walls
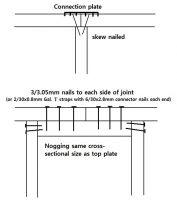
Joining wall plates: Never join top plates over an opening like a window or door.
1. Top plates are butt-jointed either:
(a) over a wall stud, with a connector plate across the joint, over two skew nails, or
(b) between two wall studs, strengthened by two nail-laminated noggings under the plate ("double nogg"), the same width as the top plate, with 3/3.05mm nails either side of the butt join above, and 2/3.05 nails from either side of the noggings.
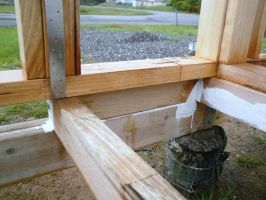
2. Bottom plates are butt-joined over solid support, like a rim joist or rim block, which is firmly secured to the joists.
kellyjones00 (593)
Click to enlarge
|
|
|
Main > Building & fixing > Building > Timber > Roof
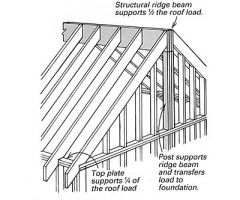
Ridge beam vs. ridge board: These are very different treatments to the apex of the A-frame, and should not be confused.
- A ridge beam is a hefty structural member, like 300 x 100mm, that supports the weight of the rafters, sitting at the peak of the A-frame underneath birds-mouthed rafters that rest on top of the beam. It should be one whole length, but if joined the joints of a ridge beam must be made over a support.
kellyjones00 (593)
Click to enlarge
|
|
|
Main > Building & fixing > Building > Lime
Safe use: Lime is alkaline like cement, with the same caustic effect on the skin. Cover the skin with damp-resistant fabric, e.g. nitrile gloves, and wear goggles. Avoid inhalation of lime dust.
kellyjones00 (593)
|
|
|
Main > Building & fixing > Building > Timber > Walls
Image of floor joist rim block: Bottom plates are butt-joined over solid support, like a rim joist or rim block, which is firmly secured to the joists.
kellyjones00 (593)
Click to enlarge
|
|
|
Main > Building & fixing > Building > Timber > Roof
- A ridge board is a smaller timber like 190 x 35mm, which does not carry the weight of the rafters but provides a connection for them. The weight of the roof pushes out at the bottom of the rafters, so they must be coupled to ceiling joists and be tied with collar ties in the top third. It may be joined in the very centre, between rafter pairs, without requiring a support.
kellyjones00 (593)

Click to enlarge
|
|
|
Main > Building & fixing > Building
Raised floors vs concrete slab on ground: A raised floor is more expensive, but gives you better access to plumbing and electrical systems that would otherwise be buried under the slab. If your house is on a flood plain, you may save on your insurance if the floor of your house is raised above expected flood level. It doesn't cost a lot more to have raised floors. Also a raised floor may mean less damage to tree roots.
[guest]
|
|
|
Main > Building & fixing > Building
Doing up an old house: Be very careful as there are many hidden costs, difficult jobs, and your interest in doing the work may wane. Imagine how much it costs to completely replace all the plumbing or electrics, with all the fixtures. Make sure you have plenty of time, and a healthy supply of cash. Some jobs, such as sewerage piping, electrics, or roofing, may need to be done by professionals.
[guest]
|
|
|
Main > Building & fixing > Building
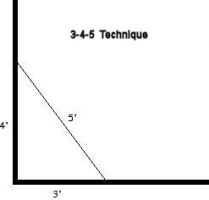
How to square something: It is important to make your corners square. Starting at the intersection point of the two lines, measure down one line 3 feet and make a mark. Measure down the other line 4 feet and make a mark. Measure accurately in a straight line between your two marks. The distance between the two marks (the diagonal of the triangle) will be exactly 5 feet if the two lines are square.
Kevin Solway (173)
Click to enlarge
|
|
|
Main > Building & fixing > Tools
Only when tools are pushed to their limits do they reveal what they're really worth.
kellyjones00 (593)
|
|
|
Main > Building & fixing > Building > Concrete slab
Instructions for a garden shed slab:
1. Measure shed floor area, then add 200mm to all sides. 100mm is the drainage gap around the slab edge, and 100mm is the border around the shed sloping down for water run-off.
2. Remove turf, roots and vegetation. Level and compact the dirt.
3. Lay about 50mm gravel bed. Level and compact.
4. Construct formwork (timber box) on a flat area using 90mm x 35mm timber. The inner perimeter is the same as the shed floor area plus the 100mm water run-off border. Diagonals from formwork corners should be equal if the slab floor is rectangular.
5. Place formwork on the gravel and install it level. On the outside of the formwork, hit pegs in every 1.5m and screw to formwork.
6. Ensure formwork has no gaps between bottom edge of timber and the gravel bed.
7. Place about 50mm bed of sand inside formwork. Level and compact.
8. Lay builders' plastic, overlapping any plastic by 200mm and sealing joins.
9. Install reinforcing mesh within the formwork, leaving 50mm gap on the outer edge for concrete to cover the metal completely. Mesh should sit horizontally about half-way or in the upper third of the slab. Use plastic bar chairs to raise it off the plastic.
10. If you will be pouring concrete alone, then install mini-forms down the slab every 1 metre. This is to avoid problems of having to interrupt concrete pours, called "cold joints". Screw a timber piece in, that can be removed when the concrete is set, and replaced with a strip of rubber (expansion joint).
11. Check the weather forecast. Do not pour cement in the rain, as it changes the recipe and weakens the slab. Also avoid dry, hot weather. Overcast days are best.
12. If using a generator, ensure it is full of petrol before starting the cement mixer. Also make sure you have water, lunch and snacks to keep up your energy.
13. Recipe for cement slab, if using "bony" large sharp pieces of aggregate (~2-3cm), is as follows, placing in cement mixer in this order: 2.5 part aggregate, 1 part water, 3 parts sand, let mix for a minute, then add 2 parts cement, add 1/2 part water, then add 1 part sand. Let mix for at least a minute. This order ensures a good mixture, and ratio is for strength.
14. While concrete is mixing for a few minutes, empty previous barrow-load into form. Pour until just higher than formwork. Cut up with shovel to ensure concrete is pushed down into any voids. Avoid pouring aggregate directly at the edges, but push sandier mix to formwork edges.
15. When a full row of concrete is in place, e.g. 3 barrow loads for 3m wide row, then put 1 part aggregate and 1 part water in mixer and let it run. This gives time to screed properly.
16. Timber screed should be 40cm wider than the slab. Screeding: first tamp then saw back and forth. Use a rubber mallet to gently hit top of formwork until bubbles stop emerging.
17. Use steel float within 3-5 minutes of screeding. Should have a jelly-like surface. Float, don't push. Use float on a low angle, smoothing and moving water off. Be efficient and quick and do not over-float as this brings cement to surface and weakens the slab.
18. When water has evaporated from the surface, use concrete edger, pushing down on the outside to create slope for water-run-off.
19. Wait 30-60 minutes after finishing before covering, to prevent the plastic sheet from marking concrete.
20. Next morning gently pour / sprinkle water over concrete and recover. Do this daily for a week, keeping slab covered.
kellyjones00 (593)
|
|
|
Main > Building & fixing > Building > Lime
Non-bearing walls: A low-cost, environmentally friendly technique uses hydrated lime to bind weeds, infilling between wall studs. Instructions:
- Shred weeds (woody twigs, small branches) into 1cm slivers.
- Set up formwork around vertical studs, to pour mix into, of about 50cm in height.
- Pour weed chips into a cement mixer or bathtub. Dampen, mix, then add hydrated lime [a.k.a. slaked lime, Ca(OH)2], sand, and cement. A good recipe by weight: 11kg dried weeds, 20L water, 18kg lime, 17kg clean sand, 1kg cement. Mix thoroughly. It should look and feel like slightly-damp muesli. Make a ball to test cohesion.
- Pour mix between wooden forms. Roughly level the surface, then tamp it lightly flat with a flat board on the end of a long stick. Don't ram, to keep air spaces for insulation. Do 15cm layers for even insulation.
- Formwork can be removed the next day, and placed above the completed section to continue upwards.
- Hydrated lime cures slowly by reaction with CO2 in the air. Keep the wall protected from direct sun, wind and rain for 3-4 weeks. Then use a breathable lime render (not concrete), or clad one side.
kellyjones00 (593)
|
|
|
Main > Building & fixing > Building > Lime
Lime binder in earth walls: A small proportion of lime is used to stabilise earth walls. Adobe and rammed earth both are made mostly of sand (~75%) with smaller proportions of clay and hydrated lime. Adobe is poured into brick forms, while rammed earth is poured between forms and tamped to compress hard to half the volume.
kellyjones00 (593)
|
|
|
Main > Building & fixing > Building > Lime
Mortar: Hydrated lime is a traditional brick mortar. It takes much longer to cure and deteriorates faster, than cement, but hydraulic limes can be used in walls with exposure to severe weather. Salt water must not be used in mortars.
kellyjones00 (593)
|
|
|
Main > Building & fixing > Building > Lime
Render / Plaster: Lime mixed with sand and water creates a white, anti-bacterial surface on internal ("plaster") and external walls ("render"). Multiple thin layers, starting coarse and ending fine and smooth, endure better. Lathe and plaster, and wattle and daub, help the lime mix stick to the wall.
kellyjones00 (593)
|
|
|
Main > Building & fixing > Building > Timber > Roof
Rafters: Getting the angles right is important for structural strength and lack of movement. Create a template rafter with the angles of the plumb cut against the ridge board, of the birdsmouth against the wall top plate, and of the end where the fascia board will be affixed. Using dressed timber makes this process much easier.
kellyjones00 (593)
|
|
|
Main > Building & fixing > Building > Timber > Roof
Erecting the ridge beam on gable roof: Temporarily fix two vertical timber studs, longer than the roof height, at either end of the ridge beam position, with a short stud placed placed nearer the top for the ridge board to rest on. Screw the ridge board to these two studs. Then place the rafters.
kellyjones00 (593)
|
|
|
Main > Building & fixing > Building > Reuse
A warning: All things change. Building materials degrade. Old timbers rot. Roofing iron rusts out, cracks and collapses. Glass becomes brittle. It may not be environmentally friendly to reuse materials, if this causes building failure.
kellyjones00 (593)
|
|
|
Main > Building & fixing > Building > Reuse
Restoring windows: While time-consuming to restore old timber windows, they are often well-made and worth the effort. Any sign of rot means the window is probably not well-made.
- Broken putty can be removed, replaced, and painted.
- Masking tape should be removed after 1-2 days, or it leaves a residue difficult to remove.
- Paint a millimetre beyond the juncture between putty and glass, for added weather-sealing. Do at least three thin coats of paint.
- Use a razor blade to remove paint or other residues from glass.
kellyjones00 (593)
|
|
|
Main > Building & fixing > Building > Timber
Delivery charges: Generally, lumber over six metres will need a crane to unload, increasing delivery charges substantially. To avoid this, opt for shorter lengths and join the timbers.
kellyjones00 (593)
|
|
|
Main > Building & fixing > Building > Timber
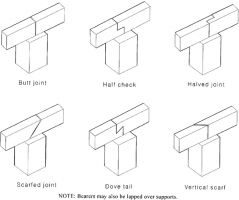
Joins: It is better to avoid joining runs of structural members, and use whole lengths instead.
Some standard structural joints of dressed timbers:
- Butt: The weakest type of join, where two ends meet along a straight line or at right angles. Butt-jointed timbers in a straight line need extra securing, e.g. with a cleat.
- Cleat: For securing butt-joined wall plates, joists, or ridge beams, preferably in non-loadbearing sections. The cleat is a piece of timber the same depth and width as those to be joined, is nailed to both, like a bandaid on skin.
- Scarf: Like a butt join, but the cut is diagonal rather than at a right-angle to the length. A bolt can run through both timbers across the join. The cut can be on a horizontal or vertical plane relative to the timbers, depending on whether the securing bolt runs horizontally or vertically through the timbers.
- Lap / Splice / Halved: The two pieces of timber overlap, either in a straight line or on a right-angle. Each lap is nailed or screwed to the other. This is a stronger type of join than those above. This is a typical strengthening joint at wall junctions at outer corners and sometimes partitions, and is seen in both the top and bottom wall plates.
- Mortice and tenon: tab into slot, often used with doors and windows, or with greenwood poles and secured with wooden dowels.
- Half check: A horizontal lap join, more suitable for bearers. A single bolt can run vertically through both laps, or a bolt to each timber separately, so long as a nail plate holds the two pieces together.
- Notching: This technique of supporting studs inside chiselled-out notches in the wall plates has been succeeded by better bracing and tie-downs.
kellyjones00 (593)
Click to enlarge
|
|
|
Main > Building & fixing > Building > Timber
Joining bearers: Avoid joins where possible, and only where fully supported by a stump or other support. Bearers must be anchored to all stumps, by for example hot-dipped galvanised bolts, hoop straps, steel rod, and so on.
kellyjones00 (593)
|
|
|
Main > Building & fixing > Building > Timber > Fasteners
Nailing structural members: with a hammer, toe-nail (aka skew-nail) 75mm x 3.15mm nails. Framing nail-gun nails used in the same way can be slightly smaller, e.g. 2.3mm diameter.
Securing fasteners with nails: 35mm x 3.15mm if using a hammer, otherwise 32 x 2.3mm for a gun.
kellyjones00 (593)
|
|
|
Main > Building & fixing > Building > Timber > Fasteners
Before securing structural members, make a test to see if the nails split the timber. If this happens, pre-drill a hole 4/5 the diameter of the nail.
kellyjones00 (593)
|
|
|
Main > Building & fixing > Building > Timber > Fasteners
Bolt holes: Structural members secured with a bolt need the bolt-hole to be drilled 0.8 - 1.5mm larger than the bolt diameter.
kellyjones00 (593)
|
|
|
Main > Building & fixing > Building > Timber > Fasteners
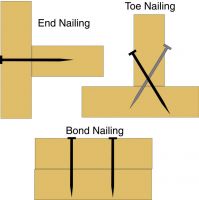
Securing floor joists: Toe-nail the joist at every crossing over a bearer. This entails two nails at maximum 45° (no less than 30°) from the horizontal, at either side of the timber.
kellyjones00 (593)
Click to enlarge
|
|
|
Main > Building & fixing > Building > Timber > Fasteners
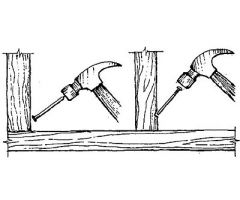
Prevent splitting timber: Blunt the nail to crush wood fibres rather than splitting them. Also, try dipping the nail in some oil or wax. Or, predrill a hole 4/5 diameter of the nail.
kellyjones00 (593)
Click to enlarge
|
|
|
Main > Building & fixing > Building > Timber > Bracing
Plywood sheets or galvanised strip bracing can be used. Ply sheets, if secured properly, also act as tie-downs of the studs to wall plates.
kellyjones00 (593)
|
|
|
Main > Building & fixing > Building > Timber > Storage
Be careful to cover timbers to avoid sun, rain, wind and earth contact, before and after they are installed. This helps prevent shrinkage, swelling and rotting.
kellyjones00 (593)
|
|
|
Main > Building & fixing > Building > Timber > Storage
Trees can be stored outdoors and last a long time, but trees are alive. Timber stored uncovered outdoors will usually disintegrate, sometimes rapidly.
kellyjones00 (593)
|
|
|
Main > Building & fixing > Building > Timber > Fasteners
Galvanised fasteners: these are flat or multi-plane plates for attaching structural timbers more strongly than using just nails or screws. They can be as simple as nail plates, which have teeth, and are often used for roof trusses, or as complex as gang-nail multi-grips, which can secure rafters to both top wall plates and adjoining ceiling joist, and secured with 4 x 2.8mm diameter nails per plate end.
kellyjones00 (593)
|
|
|
Main > Building & fixing > Building > Timber > Fasteners
Nail holes should be 8 times the nail diameter from the nearest timber edge, typically >16mm.
kellyjones00 (593)
|
|
|
Main > Building & fixing > Building > Timber > Fasteners
Tie-down straps: If using strap bracing, these 30mm wide strips of galvanised metal are "tie-downs" that hold the studs to the bottom and top wall plates, or rafters to the top wall plates. There is generally one strap every 1200mm along the wall plate (at top and bottom of the wall). The strap should reach a minimum of 250mm along the stud on both its sides.
kellyjones00 (593)
|
|
|
Main > Building & fixing > Building > Timber > Fasteners
Fastening tie-down straps: Use 5 nails per end if using a hammer, or 6 if gun-driven.
kellyjones00 (593)
|
|
|
Main > Building & fixing > Building > Timber > Windows
Window openings: Timber shrinks as it dries, even if it is kiln-dried. This reduces the size of the window opening slightly, and can put pressure on window glass. The window opening should be up to 10mm on all sides larger than the window (including reveals).
kellyjones00 (593)
|
|
|
Main > Building & fixing > Building > Timber
Levelling: For bearers, choose to install the two outermost bearers first. Erect a very taut string line as a levelling guide of the top of the first bearer. After securing this bearer, do the other outermost bearer in the same way. Then run string lines between both bearers to guide the levelling of all intermediate bearers.
kellyjones00 (593)
|
|
|
Main > Building & fixing > Building > Timber > Fasteners
Nail-laminating: For added strength, timbers like bearers are bond-nailed together, along the same principle as two match-sticks held long-wise together are stronger than a single one. The grain / rings are to be in opposing directions to counteract warping. Nails are skewed and staggered at a distance of twice the timber width, and an additional nail added at load-bearing positions.
kellyjones00 (593)
|
|
|
Main > Building & fixing > Building > Timber
Cogging: Measure floor joists to check they are all the same width. The narrowest width is the standard. Wherever all other joists cross the bearer, they are cogged, which is to chisel off excess at the bottom edge supported by the bearer. This ensures the floor is level.
kellyjones00 (593)
|
|
|
Main > Building & fixing > Building > Timber > Flooring
Platform floors vs. built-in floors: A platform floor has the floor boards or sheets installed before the walls, so that walls sit on the floor platform. Built-in floors have the wall-plates sitting directly on the floor joists, and the floor boards added after the walls and roof are finished.
kellyjones00 (593)
|
|
|
Main > Building & fixing > Building > Timber > Flooring
Built-in floors: The roof needs to be finished, walls clad, and doors and windows installed, before installing floor-boards, or else they need to be very well protected from rain to maintain a moisture content of about 12%. Also, the doubled end floor joists of built-in floors are separated and not nail-laminated together as for platform floors. They are separated by packers, 22m wide for external walls, and 45mm wide for internal partition walls, to create the ledge to nail down the ends of floor boards.
kellyjones00 (593)
|
|
|
Main > Building & fixing > Building > Timber
Cutting scheme: Ensure the timber order is specified so you have enough of the right lengths. Of stud timbers, first cut standard studs, then trimmer studs (for either side of windows and doors, supporting the lintel or header timber), then sills, then jack studs (sitting above and/or below the window and door openings), then standard noggs, then smaller odd noggs. Leave bowed timbers for noggs.
kellyjones00 (593)
|
|
|
Main > Building & fixing > Building > Timber > Bracing
Ply bracing needs to be fastened a minimum of 7mm from the panel edging.
kellyjones00 (593)
|
|
|
Main > Building & fixing > Building > Timber
Bowed pieces of timber should be placed with the bow upwards so that any weight on it helps to straighten it.
kellyjones00 (593)
|
|
|
Main > Building & fixing > Building > Timber
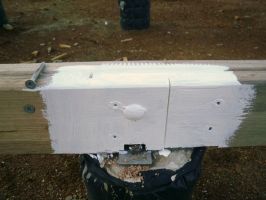
Preserving timber: The cut ends are like masses of tiny straws, sucking up moisture. For this reason, lumber ends should always be covered by other timber, or capped with metal, or painted.
kellyjones00 (593)
Click to enlarge
|
|
|
Main > Building & fixing > Building > Building tools
General tips for framing hammer use:
- 20oz is a good weight for carpentry and framing. Those with large hands can use 24oz. 16oz and 7oz are for cabinetry.
- Make sure the crown is rounded and not flat. The crown strikes the nail. A flat crown is more likely to bend nails.
- Keep the crown clean. If dirty, use sandpaper to expose the bare steel.
- Hold the handle about 35-40mm from the bottom end, the opposite end to the crown. Don't choke the grip unless just starting a nail.
- When the crown strikes the nail, the nail head, crown, handle and knuckles should all be on lines parallel to each other.
- Use gravity with the weight of the hammer head to drive nails.
- Avoid splitting timber by predrilling to 80% the diameter of the nail. Also, don't drive a nail within about 16mm of the timber edge, an inch is better. Blunting or oiling the nail tip can also help.
kellyjones00 (593)
|
|
|
Main > Building & fixing > Building > Building tools
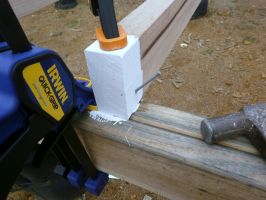
Tips for learning to skew-nail 75mm / 3" nails:
- Predrilling 80% the diameter of the nail will help, and will be essential in seasoned hardwood to avoid splitting the timber. The hole shouldn't go more than 10mm into the second timber to be joined. Standard galvanised framing nails are 3.05mm to 3.15mm in diameter.
- Use clamps on the opposite side of the nail to be driven. Later you can just put your boot there.
- Put a few drops of machine oil onto the nail.
- Gently tap the nail into the predrilled hole. Increase the strength slowly.
- Standing over the nail, hitting down towards the boot on the opposite side of the timber, will improve aim.
- Do about twenty or so nails before trying to drive the nails almost flush to the surface. As your aim improves, you can return to the earlier nails and drive them home without leaving crown dents.
kellyjones00 (593)
Click to enlarge
|
|
|
