Main > Building & fixing > Building > Timber > Storage
Unseasoned timber (greenwood) hardens as it dries, but if stored wrapped or under a tarp before the moisture content reduces through ventilation, fungi and mould will grow through the timber and it will become rotten. It is best to use greenwood timber immediately, and let it dry in a ventilated, uncovered state in the finished construction.
Oil unseasoned timber immediately after use in construction, for instance with 50% raw linseed oil and 50% mineral turpentine.
kellyjones00 (593)
|
|
|
Main > Building & fixing > Building > Timber > Roof
Coupled vs. uncoupled rafters: Coupled rafters are securely fastened to ceiling joists and the wall plates, meaning the weight of the roof does not push the wall plates outwards. Uncoupled rafters, as in a cathedral ceiling, do not have this connection to the ceiling joists, and may only be used with a ridge beam that carries the weight of the roof.
kellyjones00 (593)
|
|
|
Main > Building & fixing > Building > Timber > Roof
A solution for a ridge beam treated as a ridge board: If a ridge member called a ridge beam, with some coupled and some uncoupled rafters, has been given smaller dimensions by a structural engineer that resemble a ridge board and is consequently joined halfway without a support underneath the join, a solution is to create a king post that sits under the join, or a nearby king post extending a strut up to the join.
kellyjones00 (593)
|
|
|
Main > Building & fixing > Building > Timber > Doors
General tips for Hanging a Door:
- First place the door in the frame to ensure a 3mm clearance on all sides. 75mm x 3.15mm nails can act as spacers.
- Check the jambs for plumb (both vertical), no winding (parallel), and aligned to the same depth relative to the wall cladding
- The jambs should either be level with the interior wall lining or be a little proud
- Solid doors, or doors of 2m height, e.g. 2040mm (standard) need three hinges, and taller and wider doors need four hinges.
- Mark the locations of hinges using a very sharp pencil or a stanley knife, with the top of the top hinge 200mm from the top of the door, and the bottom hinge 250mm from the bottom of the door. A central hinge can be positioned centrally.
- If the hinge needs to be rebated, use a sharp chisel to mark out the hinge outline (don't chisel past this), then in small increments take out the depth of the hinge.
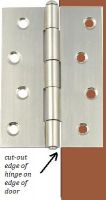
- See below image for how to align the hinge to the door. Note the slightly smaller hinge leaf is attached to the door.
- Predrill pilot holes exactly in the centre of the hinge holes. Manually hand screw the screws to the door.
- Place the door against the jamb, ensuring it is level and plumb. Set it on packers to get the correct height and clearance. Mark the hinge locations on the door jamb.
- Cut out the rebates on the door jamb carefully with a sharp chisel. A full hinge-width chisel makes this job easier.
- Predrill holes for the very top and very bottom screws, and attach these manually. Check the door for closure without binding or jamming. If all is well, continue to put in the top hinge and bottom hinge screws, and do the middle hinge last.
kellyjones00 (593)

Click to enlarge
|
|
|
Main > Building & fixing > Building > Timber > Flooring
Installing hardwood timber floor boards (General tips):
- Stack the timber flat in the enclosed but ventilated destination room for a few weeks to ensure the moisture content is suitably adjusted.
- If using recycled floorboards, use a fine file or sandpaper to remove crud from the tongue-and-groove edges. Remove nails that block tight fitting.
- Install reflective foil sarking under the floor, and then lay insulation batts on top of the sarking between the floor joists.
- Spring a chalk line down the centre of the room across the floor joists. Using 50 x 2.8mm nails, fix the first timber floor board to this line.
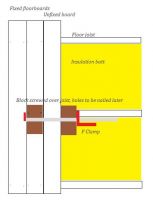
- A cheaper version of floor clamps is to use a long sturdy F-clamp. Place one foot of the clamp flat against a small board screwed to a fixed floor board, and the other foot against a small, spare piece of tongue-and-groove board (*) that slots into the unfixed new board to be nailed. Place a knee against the loose piece (*) to avoid it tilting up. When the unfixed board is tightly slotted into the last fixed board, predrill and nail it in place.
- The last board against the wall plate is pre-ripped, leaving a gap of 10mm to the wall plate. Use a pinch bar against the wall plate to push it firmly against the fixed board.
kellyjones00 (593)

Click to enlarge
|
|
|
Main > Building & fixing > Building > Timber > Ceiling
A tip for nailing tongue-and-groove pine lining planks to ceiling rafters:
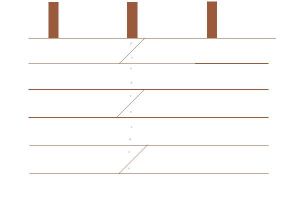
Use diagonal butt joints, the ends cut on a 45 degree angle. Stagger the joints regularly. It looks interesting and neat, and also ensures that each end gets a nail that sits squarely in the centre of the rafter.
kellyjones00 (593)

Click to enlarge
|
|
|
